
How to Add Mods to a DayZ Server: Full Guide
Install a DayZ mod with its dependencies, load it in the scope the author specifies, then join the server and try its feature. For signed client content, you also need the accepted public signing key. Server-only packages can have different requirements.
Use Workshop or an authorised release to get the files. On managed VYKIX hosting, follow Workshop installation in VXPanel. The modded DayZ hosting page covers file access, updates and testing the workload.
Before restarting:
- Back up the active mission, persistence and mod-owned settings, and check which files the backup contains.
- Check the installed files against the author’s package and dependency list.
- Put the required
.bikeyfiles for signed client mods inkeys/and check the launch settings. - For a signature error, compare versions, file integrity and accepted keys.
- Plan a join and feature test after startup, with the RPT log open for errors.
What You Need Before Installing Mods
Section titled “What You Need Before Installing Mods”Start with a server you can join and a backup you can recover.
A working DayZ PC server. Complete a vanilla join test on your managed service, VPS or dedicated server. The DayZ cost guide compares the price and administration of each option.
Workshop access. Download through Steam, SteamCMD or your host’s installer. You can use Steam on your own PC and transfer the files without running the Steam client on the server.
File transfer or local access. WinSCP and FileZilla support SFTP for uploading packages. Local access or another supported transfer method works too, including for private and non-Workshop releases.
A text editor. Notepad++ or VS Code can edit the configuration and startup arguments.
Installing DayZ Mods via Steam Workshop
Section titled “Installing DayZ Mods via Steam Workshop”Find the Workshop item, download its files and place them where your launch settings expect them. Include the dependencies and signing keys the author requires.

Step 1: Find the Mod’s Workshop ID
Section titled “Step 1: Find the Mod’s Workshop ID”Read the item ID from its Workshop URL. Community Framework (CF) uses:
https://steamcommunity.com/sharedfiles/filedetails/?id=1559212036Use 1559212036 in the SteamCMD download command.
Before adding CF to an existing world: CF’s author requires a server wipe before installation. Use a fresh test world for this example. If your saved world does not already use CF, plan the wipe and verify a recoverable backup before installing it there.
Step 2: Download with SteamCMD
Section titled “Step 2: Download with SteamCMD”For a self-managed server without a host installer, request the package through SteamCMD:
force_install_dir C:\DayZServerlogin YOUR_STEAM_LOGINworkshop_download_item 221100 1559212036quitReplace YOUR_STEAM_LOGIN with your account name and enter your password and Steam Guard code at the prompt. Keep credentials out of shared scripts. Bohemia’s Linux guide uses an authenticated Workshop download.
In this command, 221100 is the DayZ app ID and 1559212036 identifies CF. Check SteamCMD’s result, then locate steamapps/workshop/content/221100/1559212036/ before copying the download.
Step 3: Move the @ModName Folder
Section titled “Step 3: Move the @ModName Folder”Copy the package into the server root. Name the folder to match the launch settings, for example @CF or @DayZ-Expansion-Core. On Windows, the root is the folder containing DayZServer_x64.exe.
This excerpt shows a selection of CF package filenames. Copy the complete package, including the other PBOs and signatures omitted here; later releases can change these names.
DayZServer/├── DayZServer_x64.exe├── @CF/│ ├── Addons/│ │ ├── scripts.pbo│ │ ├── scripts.pbo.jacob_mango_v3.bisign│ │ └── ...│ └── Keys/│ └── Jacob_Mango_V3.bikey├── keys/└── serverDZ.cfgStep 4: Copy the .bikey File
Section titled “Step 4: Copy the .bikey File”Copy the author’s required public .bikey files for signed client content into the central keys/ directory. Check the package instructions; a server-only package may not have a client-signature key.
The .bikey is the public verification key. A .bisign beside a PBO holds that PBO’s signature. DayZ uses accepted keys to check client content, and can reject missing keys, damaged files or mismatched versions. See Bohemia mod structure.
Copy: @CF/Keys/Jacob_Mango_V3.bikey → keys/Jacob_Mango_V3.bikeyRepeat the key check for each signed client package you accept. Leave signature verification enabled.
Step 5: Update the -mod= Startup Parameter
Section titled “Step 5: Update the -mod= Startup Parameter”List normal mods under -mod=, using the installed folder paths separated by semicolons:
"-mod=@CF;@VPPAdminTools"On a self-managed server, change the batch file or service configuration that starts DayZServer_x64.exe. In VXPanel, use Mods for scope and load order. Adding another mod list in Advanced launch parameters can conflict with the one the panel manages.
Step 6: Restart and Verify
Section titled “Step 6: Restart and Verify”Restart during a maintenance window. Read the RPT and script logs in the configured profile directory, then join and use the feature you installed. Keep the exact error if either test fails.
For a content mod, check both an admin-spawned item and a natural loot spawn. An item appearing in an admin tool confirms that its class is loaded; it does not prove that the Central Economy can spawn it.
Add Modded Items to the Loot Economy
Section titled “Add Modded Items to the Loot Economy”Installing a clothing or weapon mod loads its assets. If the author supplies economy files for natural loot spawns, register those files in the active mission too. Admin tools, scripted traders and other mods can use different setup paths; follow the package instructions.
Keep the Author’s Economy File Separate
Section titled “Keep the Author’s Economy File Separate”- Stop the server and download a copy of its active mission. Check the mission selected by the server configuration or launch settings; do not edit a spare mission folder.
- Keep an untouched backup, including the mod’s configuration and persistence. The VXPanel backup guide explains how to check backup inclusions.
- In your working mission copy, create a folder called
mod-economy. - Put the author’s complete types file in that folder. Give it a filename that identifies the package, such as
example-mod-types.xml. Preserve its<types>root and closing tag. - Read the supplied values and classname list before changing them. A disabled item can have
nominalset to0for a reason.
Keep the vanilla db/types.xml. Replacing it with a mod’s types file can remove the vanilla definitions your server still needs.
Register the File in cfgeconomycore.xml
Section titled “Register the File in cfgeconomycore.xml”Add this fragment inside the existing <economycore> element, before its closing tag:
<ce folder="mod-economy"> <file name="example-mod-types.xml" type="types" /></ce>Replace the example filename with the file you saved. The path is relative to the mission, so this entry points to mod-economy/example-mod-types.xml. Keep the existing classes, defaults and other registrations.
Bohemia’s mission-file modding reference documents this registration format. When the author also supplies spawnable types or events, use the documented spawnabletypes or events file type for those files. Do not register every XML file as types.
Validate both complete XML files, then upload the folder and edited cfgeconomycore.xml to the active mission while the server is stopped. Confirm filenames and case after transfer, including on Linux hosts.
Test the Mod and Its Natural Spawns
Section titled “Test the Mod and Its Natural Spawns”Start the server, check RPT and script logs, and join with the required client mods. If you have a configured admin tool, confirm one of the author’s classnames loads. Then check a location matching that item’s usage and tier settings, allowing the economy to process new spawn requests.
If the item exists in the admin tool but never appears as loot, check the registered path, classname, nominal, min, location filters and counted existing stock. The DayZ loot configuration guide separates those checks. A restart or an admin-spawned item is insufficient evidence of a working loot configuration. Keep the live persistence while diagnosing the problem.
For a visual walkthrough, VetGamer23 registers a separate types file at 4:54 in a tutorial published on 13 February 2026. Its hosting-panel screens differ from VXPanel; use the VXPanel Mods guide for our controls.
Adding mods to a Nitrado DayZ PC server
Section titled “Adding mods to a Nitrado DayZ PC server”These steps apply to Nitrado PC hosting. Xbox and PlayStation do not accept the PC Steam Workshop packages in this guide. Nitrado’s mod installation instructions document the upload folder and Additional Mods field; its console settings reference explains the platform limit.
- Back up the active mission, persistence and mod-owned data, then stop the server.
- Download each required PC package and its dependencies. Use the DayZ launcher’s MODS > Open folder in Windows Explorer control to locate a subscribed package.
- Use the FTP details in the Nitrado dashboard to transfer the complete mod folders into
dayzstandalone. Keep folder names consistent with the load list. - Copy the required public
.bikeyfiles for signed client packages into the server’skeysfolder. - In General settings, append the folder names to Additional Mods, separated by semicolons. Retain existing packages and the author’s dependency order.
- Save, start the server and read the current logs. Join with matching client packages and test the installed feature.
For natural loot, also register the author’s economy files. A successful mod load does not register item spawns. For server-only packages, follow the author and provider’s supported loading method; keep their files out of vanilla Addons unless the package requires that layout.
Manual Mod Installation via SFTP
Section titled “Manual Mod Installation via SFTP”Get a publisher-authorised, server-ready release for content outside Workshop and follow its folder and configuration instructions. A GitHub source archive may need packaging before DayZ can load it. Upload the release with SFTP or use local access or another supported transfer method.
Folder Structure
Section titled “Folder Structure”A signed mod package can contain:
@ModName/├── Addons/│ ├── modfile.pbo│ └── modfile.pbo.modname.bisign└── Keys/ └── modname.bikeyUpload the complete @ModName/ folder to the server root. For the signed client package in this example, copy the .bikey from @ModName/Keys/ to the central keys/ directory. Follow the publisher’s requirements for server-only packages.
When to Use Manual Installation
Section titled “When to Use Manual Installation”- Non-Workshop releases. Download a packaged GitHub release or use the author’s distribution method.
- Private community mods. Transfer the authorised build with its configuration.
- Rollback. Keep a permitted known-good package that matches the game version and required client files. Updated Workshop clients may reject an old server package. Check the author’s terms and test the rollback on an isolated copy.
Check whether other active mods use a key before removing it.
For a self-managed installation, set the author’s startup argument and restart when setup is complete.
In VXPanel, upload the files, then add an Advanced local binding on the Mods page. The binding points to the existing folder; uploading and validating its files remain separate steps. Set scope and load order before restarting.
Understanding -mod= vs -serverMod=
Section titled “Understanding -mod= vs -serverMod=”Use -mod= for the normal client-visible list. Use -serverMod= when the author supports running the package without client files. Some admin tools need files on both the client and server.
| Parameter | Who needs it | Player download required | Example mods |
|---|---|---|---|
-mod= |
Server + Client | Check the publisher’s instructions | @CF, @VPPAdminTools, @DayZ-Expansion-Core, @Trader, @Code_Lock |
-serverMod= |
Server only | None when the publisher supports this scope | Packages documented by the publisher as server-only |
The VPPAdminTools installation guide loads CF before VPPAdminTools in -mod=:
"-mod=@CF;@VPPAdminTools"Keep that dependency order and test after each change. If a feature fails, check configuration, permissions and versions along with loading scope and dependencies.
Choosing packages for your server
Section titled “Choosing packages for your server”Choose mods around the rules and features your players want. These are examples, with author links for requirements and release notes. Their inclusion does not establish compatibility with your game build or mod set. Start with the required packages, test them, then add more.
Essential Foundation
Section titled “Essential Foundation”| Mod | What it does | Dependency |
|---|---|---|
| Community Framework (CF) | Provides a shared framework for mods that require it. | Check its first-installation wipe requirement above |
Install CF when a chosen mod calls for it. The Expansion installation guide also lists Dabs Framework and explains which modules or bundle to use.
For servers built around Expansion, DayZ Expansion hosting covers module choices, mission-file access and launch checks.
Use the Expansion installation procedure to choose modules and merge their mission files. For trading, continue with Expansion Market setup after the client join passes.
Gameplay Mods
Section titled “Gameplay Mods”| Mod | What it does | Dependency |
|---|---|---|
| DayZ Expansion (Core + Modules) | Adds modules for vehicles, AI patrols, base building and other community features. | CF, Dabs Framework and the requirements of the selected modules |
| Trader | Adds trading and economy features. | Read the current publisher’s required-item list |
| Code Lock | Adds keypad locks to supported gates. | Read the current publisher’s requirements and licence |
| TraderPlus | Adds trading, banking and related economy features. | CF; read the author’s first-launch CarLock precautions before using an existing vehicle save |
For the original Dr_J0nes package, use Trader installation and configuration. Its profiles files and NPC markers are separate from Expansion Market’s configuration.
Building and Base Mods
Section titled “Building and Base Mods”For a complete deployment, use BaseBuildingPlus installation or Code Lock installation and permissions. Each includes its mission files, configuration and player checks.
| Mod | What it does | Dependency |
|---|---|---|
| BuilderItems | Exposes map objects for placement with an editor. | Required on client and server; the author warns against adding it alongside Expansion packages that include its assets |
| MuchStuffPack | Adds furniture, storage containers and decorative items. | MuchFramework; author support ended at DayZ 1.26. Compatibility with the current build is unverified |
| Base Building Plus | Expands the available construction options. | CF; include the author’s economy definitions to preserve placed objects |
Admin and Server Management
Section titled “Admin and Server Management”| Mod | What it does | Dependency |
|---|---|---|
| VPPAdminTools | Provides logging, teleport, player management and a map interface; load through -mod= after CF. |
CF |
| COT (Community Online Tools) | Provides player controls and administration tools such as object spawning. | CF |
Use the COT installation and permissions procedure for owner access, staff roles and normal-player checks. For decorative map edits, use BuilderItems deployment and the DayZ Editor Loader procedure.
Map Mods
Section titled “Map Mods”Namalsk Survival adds survival mechanics for Namalsk and supported cold terrains. The terrain is a separate package. Read the author’s terrain, dependency and licence instructions to get the complete set of files.
The Namalsk Island and Survival installation guide covers both packages, the supplied mission presets and the first map and survival-system checks.
PvE and roleplay servers can use different mod lists. Build the smallest set that supports your rules, testing a join and the main feature before adding the next package.
Troubleshooting Mod Conflicts
Section titled “Troubleshooting Mod Conflicts”After a failed start or crash, save the RPT and script logs with the package versions and last change. Use those details to narrow the cause.
Where to Find RPT Logs
Section titled “Where to Find RPT Logs”Check the profile path in your launch arguments. If it contains -profiles=C:\DayZ\Logs, look in that folder. Otherwise, confirm which server profile directory is active; Bohemia puts logs there by default. The working directory and service account can affect the files you find.
Use the RPT dated for the failed start or crash and keep the lines before the error as well as the error itself.
Common Errors and Fixes
Section titled “Common Errors and Fixes”“Signature verification failed”
Find the rejected filename, then compare client and server versions, file integrity and accepted keys. Obtain matching PBO, .bisign and .bikey files from the author and retest. Keep signature verification enabled and check shared-key use before replacing a key.
“Mod not signed”
Check for signature files and the author’s accepted public key. A .bikey verifies signatures; it cannot sign an unsigned PBO. Get a signed release where client verification requires one.
“Access Violation” crash
This error reports a process crash without identifying its cause. Save the crash and script logs, build, mod versions and the action before the crash.
Test removals on an isolated, backed-up copy. Removing a content mod from the live world can affect saved objects. Keep dependencies intact, change one suspected package or setting, then repeat the activity. A short crash-free run gives you a lead to test further.
Server starts but a mod feature does not work
Work through the author’s setup, checking configuration, permissions, scope, dependencies and compatible versions. A load-order problem is one possible cause.
General Troubleshooting Steps
Section titled “General Troubleshooting Steps”- Save RPT and script-log lines around the failing action.
- Match package versions and keys, checking other active packages before removing a shared key.
- Load dependencies before their dependents in the author’s required order.
- Check compatibility guidance for the versions you installed.
- Reduce the mod set on an isolated copy, keeping dependencies and the original persistence intact.
Workshop Mod Installation in VXPanel
Section titled “Workshop Mod Installation in VXPanel”On our managed DayZ service, open the Workshop catalog from VXPanel’s Mods page. Search for the title or ID, then open the item to check that you have the right package.
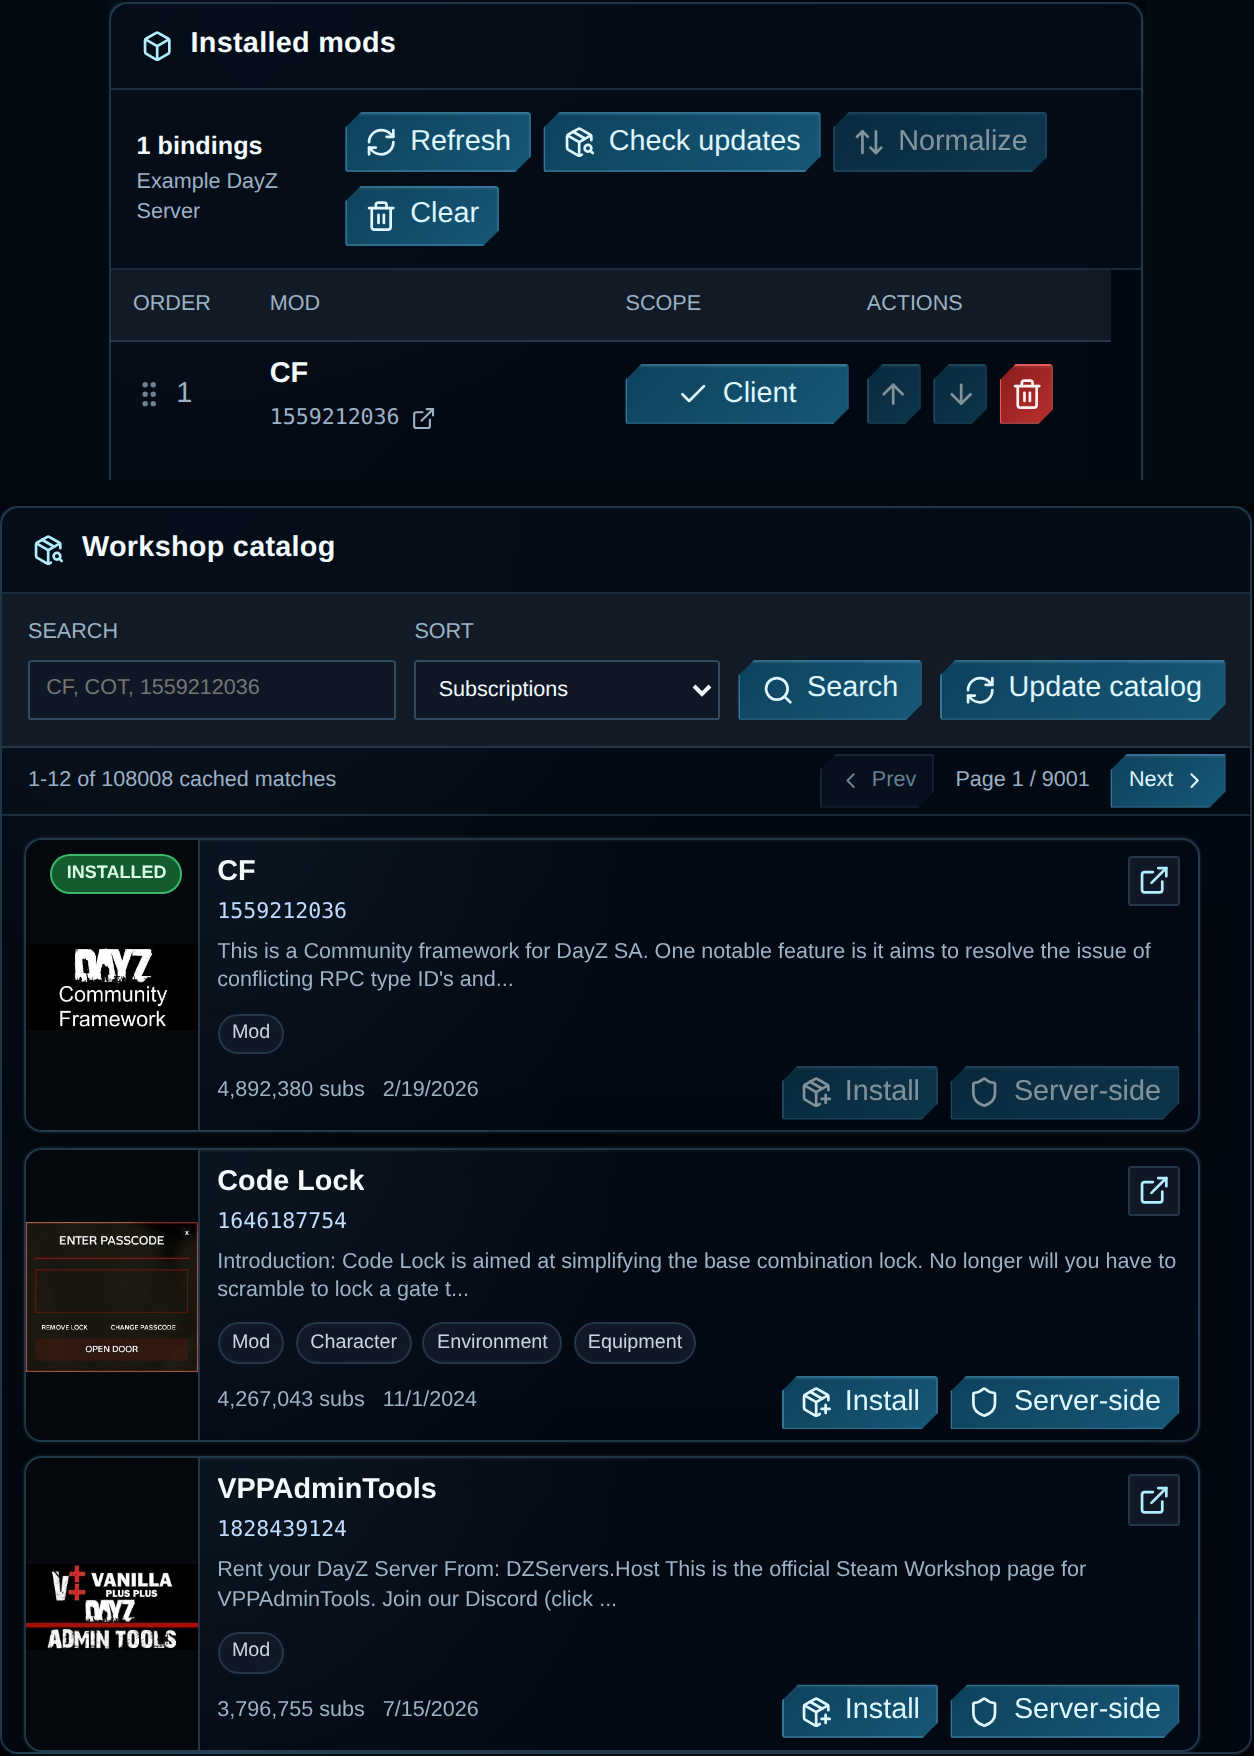
An example CF installation in VXPanel. The catalog counts shown belong to this documentation image. Source.
For normal client content, select Install. Choose Server-side when the author supports that scope. Check required mods, wait for the package under Installed mods, then review load order before restarting. The panel guide allows one active install per server. Reopening the page during a job returns you to its status.
Check updates compares installed-copy timestamps with cached Steam timestamps. Update catalog refreshes Steam information. To install changed files, confirm Restore mods on startup under Advanced settings or ask support which update workflow your service uses.
After updating and refreshing the catalog, recheck status. For join failures, compare client/server versions, keys and scope with the author’s instructions. Read removal confirmations: removing a numeric Workshop binding deletes its Workshop folder, while removing a local binding leaves the files in place. Back up mod-owned data before either change. The panel mod guide explains these controls.
Test the mods, scripts, settings and player activity together when choosing capacity. The DayZ cost guide covers plans and the maintenance budget.
VYKIX DayZ hosting includes VxShield, combining upstream mitigation with our own filtering for game traffic. The StalkerZ case study follows the changes we made as the attack developed, and the DayZ DDoS docs explain the packet and query controls.
Common Questions
Section titled “Common Questions”How do I add mods to my DayZ server?
Section titled “How do I add mods to my DayZ server?”With a manual install, copy the author’s files, keys and dependencies, then use their startup settings. In VXPanel, install through the Workshop catalog and check requirements, scope and order before restarting. Choose Server-side for packages whose authors support server-only loading.
What is the -mod= parameter in DayZ?
Section titled “What is the -mod= parameter in DayZ?”The -mod= argument selects the normal mod list. Use the installed folder paths, separate them with semicolons and quote the argument, for example "-mod=@CF;@VPPAdminTools". Load dependencies in the order the author specifies.
Why do I get “signature verification failed” in DayZ?
Section titled “Why do I get “signature verification failed” in DayZ?”Check the rejected filename against the client/server versions, signed PBO files and accepted keys. Get matching, intact files from the publisher and try again. Leave signature checks enabled and keep keys that other active mods need.
What is the difference between -mod= and -serverMod= in DayZ?
Section titled “What is the difference between -mod= and -serverMod= in DayZ?”Use -mod= for normal client-visible mods and -serverMod= for packages the author supports as server-only. Admin tools may need client files too; VPP’s guide puts CF and VPPAdminTools in -mod=.
What mods does my DayZ server need?
Section titled “What mods does my DayZ server need?”Install the packages required for the features you want, including their dependencies. Expansion’s installation guide lists CF and Dabs Framework; VPPAdminTools lists CF. Check each author’s supported versions and setup before adding a package.
Can I install DayZ mods without Steam Workshop?
Section titled “Can I install DayZ mods without Steam Workshop?”Yes. Get an authorised, server-ready release and follow its licence and installation instructions for folders, dependencies, keys and startup. A source archive may need packaging. Transfer the release over SFTP or another supported method, then test with the required client files.
Run Your Modded DayZ Server on VYKIX
Section titled “Run Your Modded DayZ Server on VYKIX”Before moving your community, test the configuration you intend to run. Check joins and dependencies, then spend time in the areas that will be busiest.
VYKIX modded DayZ hosting includes game-file and configuration access, Workshop installs in VXPanel and VxShield protection. There is no added slot fee when you set the player cap; the plan’s fair-use resource limits still apply. Choose your DayZ plan.
For a first launch, follow the DayZ setup guide. For cooperative rules, compare DayZ PvE hosting and work through the damage and zone tests in the PvE setup guide.
To tune the world after installation, use the zombie spawn guide and loot configuration guide. Test one change before adding the next.
Moving an existing server? Ask about migration help and seven extra days on an eligible paid plan. We agree the files and timing before starting the best-effort transfer.